Saturday, October 11, 2014

DIY VanLife: GMC Savana Camperization – Insulation and Walls

When I worked my first field season in northern Alberta in the summer of 2011, I learned a few very important life lessons:

1.     If it can go wrong, it will
2.     Things always take longer than you plan
3.     It could be worse

I would like to add two pieces of advice to this list, which we have found to be directly relevant when camperizing a van…

4.     When selecting a vehicle, be sure to factor cleaning needs into your conversion time budget
5.     Rounded vans DO NOT EQUAL nice square boxes

With these things in mind, we are pleased to (finally!) announce that the floor, ceiling, and walls of our vanlife home conversion are now completed! It took us two full weeks to get where we are now, but we are very pleased with our final product. For those interested in meeting the "Millenium FalcVan" and the conversion process thus far, the following is a step-by-step documentation of what we've done so far. 

***

First off, we did NOT start with a clean slate. The van was very dirty, with two fairly major setbacks: (1), there was drywall/plaster dust in absolutely everything, and (2), an oversight on our part, it smelled of stale cigarette smoke. We ripped everything apart inside. The mouldy flooring, the walls, all the panels - doors, siding, ceiling cover in the cab, dash. We removed the front seats and washed and carpet cleaned those. We washed and scrubbed everything and repainted spots that needed it. After a ton of hours of effort, here is what we finally had to start with:


Graham and I spent countless hours pouring over conversion blogs and picking people's brains over how to proceed. Turns out nearly everyone does this differently, which means we've naturally had a lot of important decisions to make. This has been one of our biggest challenges I would say - neither of us has taken on a project anything like this before. It is a HUGE learning experience, and as we really want to do a decent job, the thinking/planning is of course taking us a really long time. We are happy with the final decisions we have settled on, but that doesn't necessarily mean that our method is the only or the best way to do this stuff. 

We spent quite a while thinking and planning the insulation. There are a few important things to consider with insulation:

(1) it keeps the heat in (or out!) if done properly
(2) in a metal van, it can largely dampen the noises
(3) air pockets are essential for insulation to work
(4) insulation is only as strong as the weakest link. 

For these reasons, we needed to insulate every surface we could reach, while accepting the fact that in a metal van, thermal bridges are everywhere in the structure, sucking heat all around. 

We opted for pink fiberglass insulation that we bought in roles, and "ayr foil", or fancy-foil-covered-bubble-wrap. 


The fiberglass was 3.5 inches thick with an R-value of 12, which we were quite excited about. The foil wrap varies depending on the application, so we're not so clear on its rating. The nice thing about the bubble wrap is it is clean and easy, and all the tiny little bubbles keep the nice little air pockets in wherever it is placed. We used 3M 77 spray adhesive to adhere the fiberglass to the walls.


We separated the fiberglass into half-width strips to insert it into the door pockets on the side and at the back. 


Before we could insulate the ceiling, we needed to cut and install a vent in the roof. A vent is really important in a van, especially at night when condensation can build up just from breathing as you sleep. Cutting through our metal roof was pretty nerve-wracking, but Graham did a great job! We made a template first then traced the hole onto the ceiling. Graham used a jigsaw with a metal blade, and cut from the bottom up. We got our vent from a local RV store, and a vent installation kit from Canadian Tire, which came with screws and putty tape.


Once the vent was installed we decided we needed to put in the floor to work off of. From the bottom up, we used (1) the foil bubble wrap, (2) 1/2 inch plywood, (3) 1/4 inch laminate flooring from my old bedroom at my parent's house. We used two 4x8 foot plywood sheets for the floor. One sheet went in whole and covered the to-be "living" area where we will be walking the most. We measured and cut and fit all the plywood (4 pieces total) before putting down the insulation so that we wouldn't have to walk on the insulation after it was in.

We spent some late nights cutting those boards. Thank goodness for the 5000 watt floodlight... Most cuts were done with the jigsaw, but we used the table saw for long straight cuts.


After we cut the plywood, the insulation could go down: wheel and gas wells, the entire floor, and the sliding door step so as to not lose heat anywhere. Side note - check out that nice back door panel!! We used 5/8" metal self-drilling screws to attach the back door panels we cut.


 Once the insulation was in, the plywood could go back down. As we had four pieces and are planning to build everything in the van off of the floor, we needed to screw the plywood to the base of the van. This ended up taking AGES to figure out. We spent a lot of time lying on the ground underneath the van looking at all the "guts" and trying to figure out where the screws would go through. We needed to line up each screw to go into the floor on one of the raised ridges, and ensure it wouldn't pierce anything on the other side. Take my word, very difficult to do. We ended up using just 9 screws in total, and then Graham used Sikaflex sealant around the entry point under the van for every screw he could reach.


We used a drill bit to make a little divot in each screw spot so that the heads would be flush with the boards.

The laminate flooring went down next. While a bit finicky, laminate flooring is actually pretty straightforward, and fun! It's a "floating floor", and so won't be screwed down until we begin to screw things to it. 

After the flooring was complete we continued with walls and ceiling. I split the fiberglass insulation into half-thickness for the ceiling as the metal structural ceiling beams were about 1 1/2" thick.


We cut the insulation to fit between the metal beams and the wooden vent frame - structural components we eventually screwed the ceiling panels to. In the corner of this photo you can also see the ceiling in the cab above the seats. I used more 3M 77 spray to attach fitted bubble wrap insulation up front that the original ceiling cover would eventually sit on top of.


Meanwhile, Graham was working on building up the structural beams (studs) on the walls. Similar to the ceiling, the metal studs were only about 1 1/2" thick - but remember our wall insulation was 3 1/2" thick. Using 2x2s to build up the studs enabled us to use the full thickness of insulation without compressing it, reduced the roundness of the interior, and would enable our walls to meet with the ceiling.


Once all the insulation was completed, up went the vapour barrier, which we stuck to everything using double sided tape and tuck tape. The main purpose of vapour barrier is to keep warm moist air from moving into the insulation and condensing. There's a fair amount of controversy, however, on whether a vapour barrier is really necessary in projects like this. And keep in mind that with SO many little gaps and holes all over, it would be impossible to truly barrier everything effectively. For these reasons, our main purpose of adding the barrier was just to keep the insulation fibers OUT of our living space.


We used 1/8" mahogony finish plywood (the cheapest!) for the ceiling and walls. It took us five 4x8 foot boards to do the whole interior. Two boards with a seam in the middle did the ceiling.

We had to cut all the boards with the jigsaw as they were too floppy-floppy for the table saw. This was very time consuming...


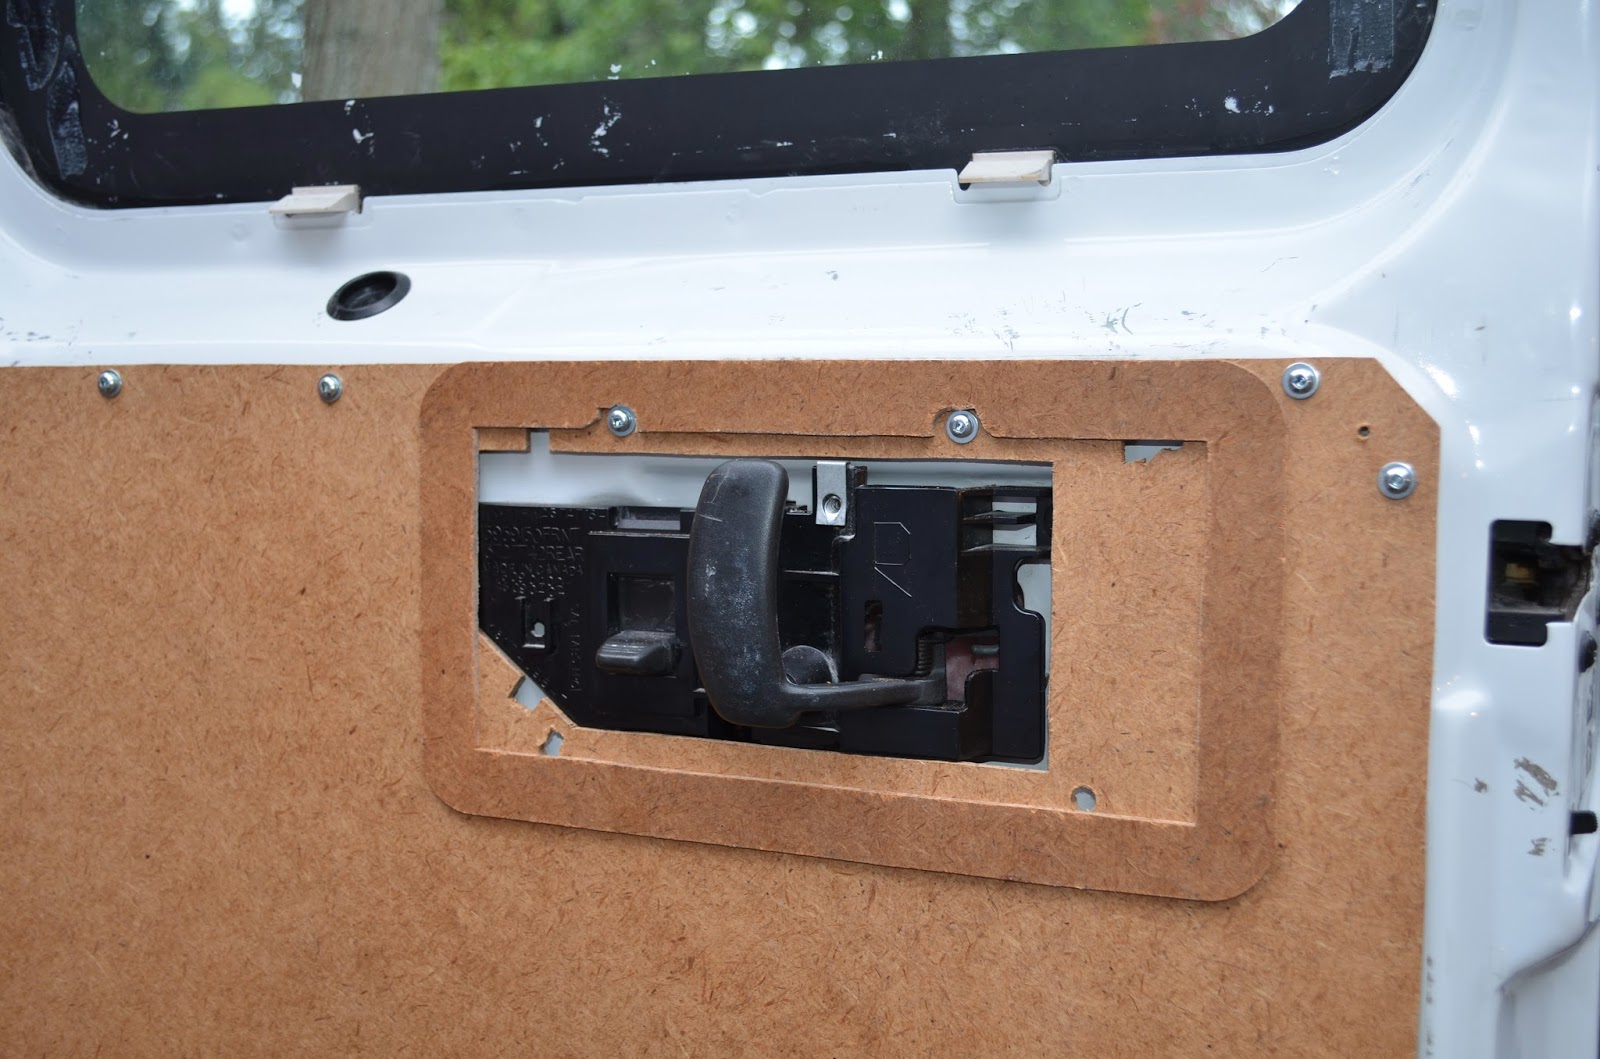
Another side note. We decided we would re-attach the original handle cover to the back door. This is an example of small details taking a long time. The cover would not sit flush, so we used an exacto knife to cut off the plastic bits in the back AND built a spacer to go underneath it. We ran into a similar scenario with the sliding door step...


Lots of finicky measurements led us to finally getting all the walls up. Metal screws and wood screws, depending on where we were attaching. We used flat washers with the metal screws, and fat little donut washers with the wood screws.


We used the original step for the sliding door entrance, which fit nicely over top of the main flooring. Two layers of 1/2 inch plywood over the insulation on the step itself brought the height to the right level. We used rubbery edging attached with contact cement around the base for a protective finish.


And this is how we made it to the final product. A couple pictures of our enhanced clean slate, ready for construction!


Again, as we're new at this we'd love to hear any comments, questions, or suggestions!

All for now. Ta ta!

Tuesday, September 23, 2014

An Escape to Powell River and a Master’s Degree!


After two long, hard, fun, and incredibly rewarding years, I proudly defended my MSc thesis on September 5, 2014.  Despite how anxious I was going into the defence, I thoroughly enjoyed the experience, and it was great to have so many wonderful friends there to support me.  

 (1) Defending my MSc thesis (2) Super awesome LCSRG t-shirt from Meg!

Then, following a weekend of celebrating and editing, Graham and I took off to Powell River to meet our friends JF and Sophie for a week of camping and climbing in the Eldred Valley. What a spectacular place! We drove 34km up a logging road to reach the Colin Arthur Dionne Memorial campground – base camp for all the climbing in the valley. The campground was impeccable, situated within a beautiful stand of second growth right beside the Eldred River. The valley is breath-taking and surrounded by the giants: Psych Slab, Carag Dur, West Main, West Main Buttress, and more. 


CAD campground in the Eldred Valley
The Eldred River in the morning
A view of Carag Dur from Psych Slab
We climbed three days on Psych Slab. The granite is very fine grained compared to the Squamish slab crystals that we are used to. Each day took us to new levels in trusting our feet to stick to what seemed surely impossible. The first day on the slab we climbed the first 4 pitches of S.R.I (5.10). Graham and I swapped leads, which was a huge new accomplishment for me – first time swapping leads on a trad/slab multipitch, and as an onsight! The next day we attempted Schizophrenia, the 12-pitch classic 5.10 that climbs the centre of Psych Slab to the summit, but heat, nerves, and time stopped us at the top of the fifth. We also tried Day Pass (5.7) and Racknophia (5.10/11).  It was really eye-opening how challenging the climbing was. The slab felt impossible to stick to – and yet we did – creating an interesting mental challenge between the spaced bolts. Being a place mostly untraveled, much of the slab had lichen on it, which only accentuated the challenges. 


JF nearing the top of P1 on S.R.I.
Sophie leading P4 of S.R.I

All racked up to lead Day Pass!
Graham leading P1 of Racknophobia, and me trying on top-rope after
Our other two climbing days were spent bouldering. The granite is sticky and textured, there are boulders everywhere, and there is tons of potential for new development. We were like kids in a candy store! We climbed a few fun problems that were already established, but spent a good chunk of our bouldering time scrubbing and climbing new things.

Sophie, me, and JF bouldering at the powerline boulders
Graham working the moves on his newly scrubbed problem "The Princess" V5
G working the moves of a project by the river, just before the send. He called it "Biere dans la Riviere" V7
Sophie on the first ascent of her problem "Safety Fun", and me scrubbing my line "Safety Club"
The rest of our time in Powell River was spent enjoying the gorgeous weather, hanging out by the river, eating delicious food, practicing our French, and enjoying evening campfires.
Aftermath of the celebratory-champagne-mishap
Graham and I during "river bathtime"
"Wild Kids" and "Safety Club"

We are very excited to return to Powell River next year, earlier in the season perhaps to avoid the heat. If you are interested in heading over to check out the awesome climbing and potential in this area, check out Kevan Robitaille’s blog here.

Inside a giant tree stump!
I have now completed all the requirements for my degree, and Graham has finished his job at MEC. This weekend we moved back to the island to begin working on the Millenium FalcVan, our travel vehicle for the next year ++. We are really going to miss the people of Vancouver, from SFU, MEC, and the climbing community – we hope to cross paths with you all on our future adventures.

Cheers,
Kim


Sunday, June 15, 2014

Snip snip

Tomorrow marks 6 weeks since I had the bilateral medial meniscectomy (double knee surgery). Basically, one of the little pads that protects the bone surface between the femur and the tibia/fibula on each of my knees had a tear in it, and that tear had a little flap that was floating around my knee causing inflammation and pain. The surgery is fairly straightforward and uninvasive (while still cutting me open...). But, lets step back a bit first.

My left knee has bothered me off and on for the last 10 years or so, possibly from a hockey injury, but I can't remember an exact event when it started. Every now and then it would let out a loud pop and then hurt for a few days. For some reason I guess I thought this was normal and never had it looked at. Then, when bouldering in Squamish one day last June, and walking between problems, I felt like my right knee needed to pop (similar to how one would pop or crack their knuckles). A few hours later, I could hardly bend my leg at all due to the swelling and pain.

The next day I booked a physio appointment to try and find out what was up with my knee. I saw physio for a few sessions as we aimed to solve what was causing the swelling. At first they thought it had to do with the alignment of my knee caps so they had me doing some exercises trying to correct that. I guess my left knee began to compensate for the right and soon I had two very swollen and sore knees. The physio began exploring other options, one of which was a torn meniscus, that could be causing my knee to be sore. They did a simple test of pushing my heel to my bum while twisting my foot laterally and, low and behold, it hurt. This was enough for the physio to suggest I see a doctor to get referred for an MRI.

This is when the waiting game started. After getting a referral for an MRI, I had no clue how long I'd have to wait. "We will call you closer to the date" was all I was told. Then, one morning in July (2013) I received a call from VGH Radiology Department: "We are currently scheduling MRI's for December 2014, but we have a cancellation tomorrow morning at 6AM, can you make it?" Heck yes I can make it, like anything is more important than NOT waiting 17 more months...

The MRI was pretty neat - they put me in a big tube that made retro video game noises for half an hour. One week later I received the MRI report which showed positive for a complex tear of the medial meniscus in my right knee. With this I was able to see my GP and get a referral to a surgeon. I was referred to the Rebalance MD clinic in Victoria. Rebalance has this neat concept they refer to as FAAST - First Available Appropriate Surgeon Triage. You can choose to be referred to a specific surgeon, or, like in my case, you can choose to be referred to their FAAST system. The patient is triaged to the first surgeon who is available to do the necessary work. In August, I saw Dr. Norgrove Penny who did an assessment on my knees. He concluded that, in his opinion, there was a torn meniscus in the right knee. I also asked him about the pain and swelling in my left knee and, even without the MRI, Dr. Penny was able to conclude that the left was probably torn as well. I was then referred to Dr. James Stone to do the actual surgery.

I did a lot of reading online regarding surgeons beforehand and Dr. Stone had by far the best rating out of all the surgeons I found. I have to echo these same thoughts. He took a genuine interest in my situation as well as my climbing. He seems to take a laid back, yet professional, stance in his appointments which really put me at ease about the whole situation.

Fast forward half a year to May 5, 2014 and I am laying in a hospital bed recovering after having both knees worked on. My instructions were to only move when I had to, not when I wanted to, for the first 3 days, and to slowly begin to bend my knees a bit when able. After these 3 days, I began to move around a little more, bit by bit, to get some range of motion back in my knees. Thankfully, the crutches allowed me to move under my own power and I could do most things by myself. After about a week, I was able to lose the crutches and Kim and I decided to come back to Vancouver. Walking was pretty awkward and stiff legged, but it was nice to be able to move around without the crutches. Over the next couple weeks I began to gain more and more range through my legs.

Kim as my patient nurse. She removed, cleaned and reapplied my bandages daily

Walking was pretty impossible at first...but I graduated to crutches, and then free walking after a week!

Showering was also a fairly big challenge...

I saw Dr Stone again 3 weeks after the surgery for the post-op appointment. It turns out both legs had the same tear on the medial meniscus, and the little torn piece had flipped under the meniscus in an attempt to vacate the knee. This explained why I wasn't able to bend my leg all the way - I had a piece of meniscus blocking it! Dr Stone said that, aside from the tear, my knees were "pristine" which was really nice to hear. He still stressed no climbing or other leg intensive activities until the 6 week mark.

I am now nearly 6 weeks post surgery and the knees are feeling fantastic. I am able to ride the stationary bike without any pain, and the swelling has reduced almost entirely - I can bend my legs well past 90 degrees now. Despite not being able to climb, I have kept busy doing some core work outs and training on the hang board. It has been pretty hard the last few weeks as I keep hearing about my friends sending all their projects. I am super stoked for them and cannot wait to join them on the next projects.

Kim and I working core and upper body strength on the monkey bars at the playground by our house!

Hanging out at Paradise Valley while Cory, Kim and Marc are bouldering

Our main focus over the past couple weeks has been checking out vans. Our trip is growing closer at an alarming rate and we really need to focus more on the van situation. I have a feeling camperizing one is going to take us a lot longer than we expect, as neither of us really have any experience doing anything like it. We're both super excited to be creative and make it livable though. We've test driven some really nice vehicles, and are feeling pretty close to making a decision...hopefully within the week. As I'm now allowed to start climbing (gently) again, we'd better find a van soon, as it'll be hard to trade off one activity for the other!

-Graham

Sunday, April 6, 2014

Springtime countdown...


Just under one month remains before Graham goes in for his double knee arthroscopy in Victoria to mend his pesky menisci. He'll be off his feet for about two weeks, and not back in full climbing form for at least 3 months. It will be very difficult to refrain from pushing it too hard during the healing process, but on the flip side, there are no limits on pushing it beforehand! This has sparked strong motivation to make the most of spring climbing - in a time of freshness and new beginnings (in between the rain days!)

From February 7-16 we travelled to Red Rocks, Nevada, for a climbing adventure with these beautiful people:
Dan, Emrys, Yannick, Kirsten, Allison, Nicole and us.
"WE WENT TO LAS VEGAS... to be bums on rocks?"

While we had to accept the unexpected twists of 9 hour flight-delays (thanks for the $8 voucher Allegiant...), strange tummy bugs (I will not expand), and no coffee pot (we remedied this), we also had seven glorious days of climbing. We spent most of our days sport climbing in the sun, with the exception of an adventurous multi-pitch day on "Dream of Wild Turkeys" (moonlight rapelling!).

Dan and I at the top of pitch 7, Dream of Wild Turkeys
Red Rocks is a gorgeous place, with so much climbing that we could have spent weeks there. The rock is a gorgeous sandy red, and the desertscapes are beautiful. Here are a few of the photo highlights of the trip.
Day 1 sunset in Red Rock canyon
Nicole and Dan being snazzy 
Delicate Kirsten [photo cred: the Emrys cam]

Nicole and a sunbeam
Emrys on Geometric Progression (5.12b)


We could hardly believe how beautiful each day was.


Graham climbing
The Gift (5.12d)
[photo cred: the Emrys cam]
Yannick climbing
Fear and Loathing (5.12a)
Kim climbing
Where Egos Dare (5.12a)
[photo cred: the Emrys cam]

There were some very cool climbs that called for superstar moves as well, particularly at Trophy Wall...

Graham resting, Dan doing a superstar, and Yannick flying!
Graham made some awesome progress on Monster Skank (5.13b). A bit more time and it probably would have gone.
Gearing up for Monster Skank
All in all it was an awesome trip, and we can't wait to go again.

Back in Vancouver, the weather hasn't exactly been wonderful, so our days in Squamish have been fairly limited. Mother nature gave me a lovely birthday gift with sunshine on April 1st, however, so we headed up after work for an evening session. It's hard to believe the days are already long enough to climb until 8:00pm! I worked on Sloppy Poppy again and made some good progress, then we headed to a climb Graham had tried a couple years back and wanted to get on again. After working the sequence with friends Frank and Tom, and figuring out the blasted first move, Graham sent his very first V10: No Troublems. What a super exciting way to finish the day!! And to top it off, we got free birthday cake at the brewpub after our session :) :)

Graham on No Troublems, V10

All for now. Wish us good April weather and fast recovery from surgery in May <3