~ Kim and Graham
Showing posts with label Millenium FalcVan. Show all posts
Showing posts with label Millenium FalcVan. Show all posts
Monday, January 12, 2015
Bouldering in Bishop - VIDEO
We finally finished putting together a video of some of our Bishop bouldering highlights. This was the first stop on our North American rock climbing tour...
~ Kim and Graham
~ Kim and Graham
Saturday, December 20, 2014
Bye bye Bishop
The end of December is nearing and it is time again to hit the road. We have loved every moment of the experience in our first destination, and are definitely psyched to return.
The shelf that holds many of our random bits. Books on hand, first aid kits, muscle/tip/dry skin equipments, etc etc. Yoga mats for essential stretching times.

Our kitchen area! Many more essential things (food!) are stored in these cupboards. The counter is just the right size for prepping cold meals late at night, or storing delicious 35 cent loaves of bread from Erick Schat's bakery...

The front area, behind the curtains. This tends to be the hardest to keep organized, mostly because of the constant turnover of hiking shoes/flip flops/climbing shoes/camp slippers, and the (many) very inexpensive cases of beer... Our plug-in cooler, which has been working GREAT as powered off our solar panel, fits perfectly between the seats.

The bed has turned out to be plenty big enough and nice and cozy. We have a thermometer in the van, and so far mornings have been between about 3 and 6 degrees when we wake up - so the hardest part about the bed seems to be getting out of it!

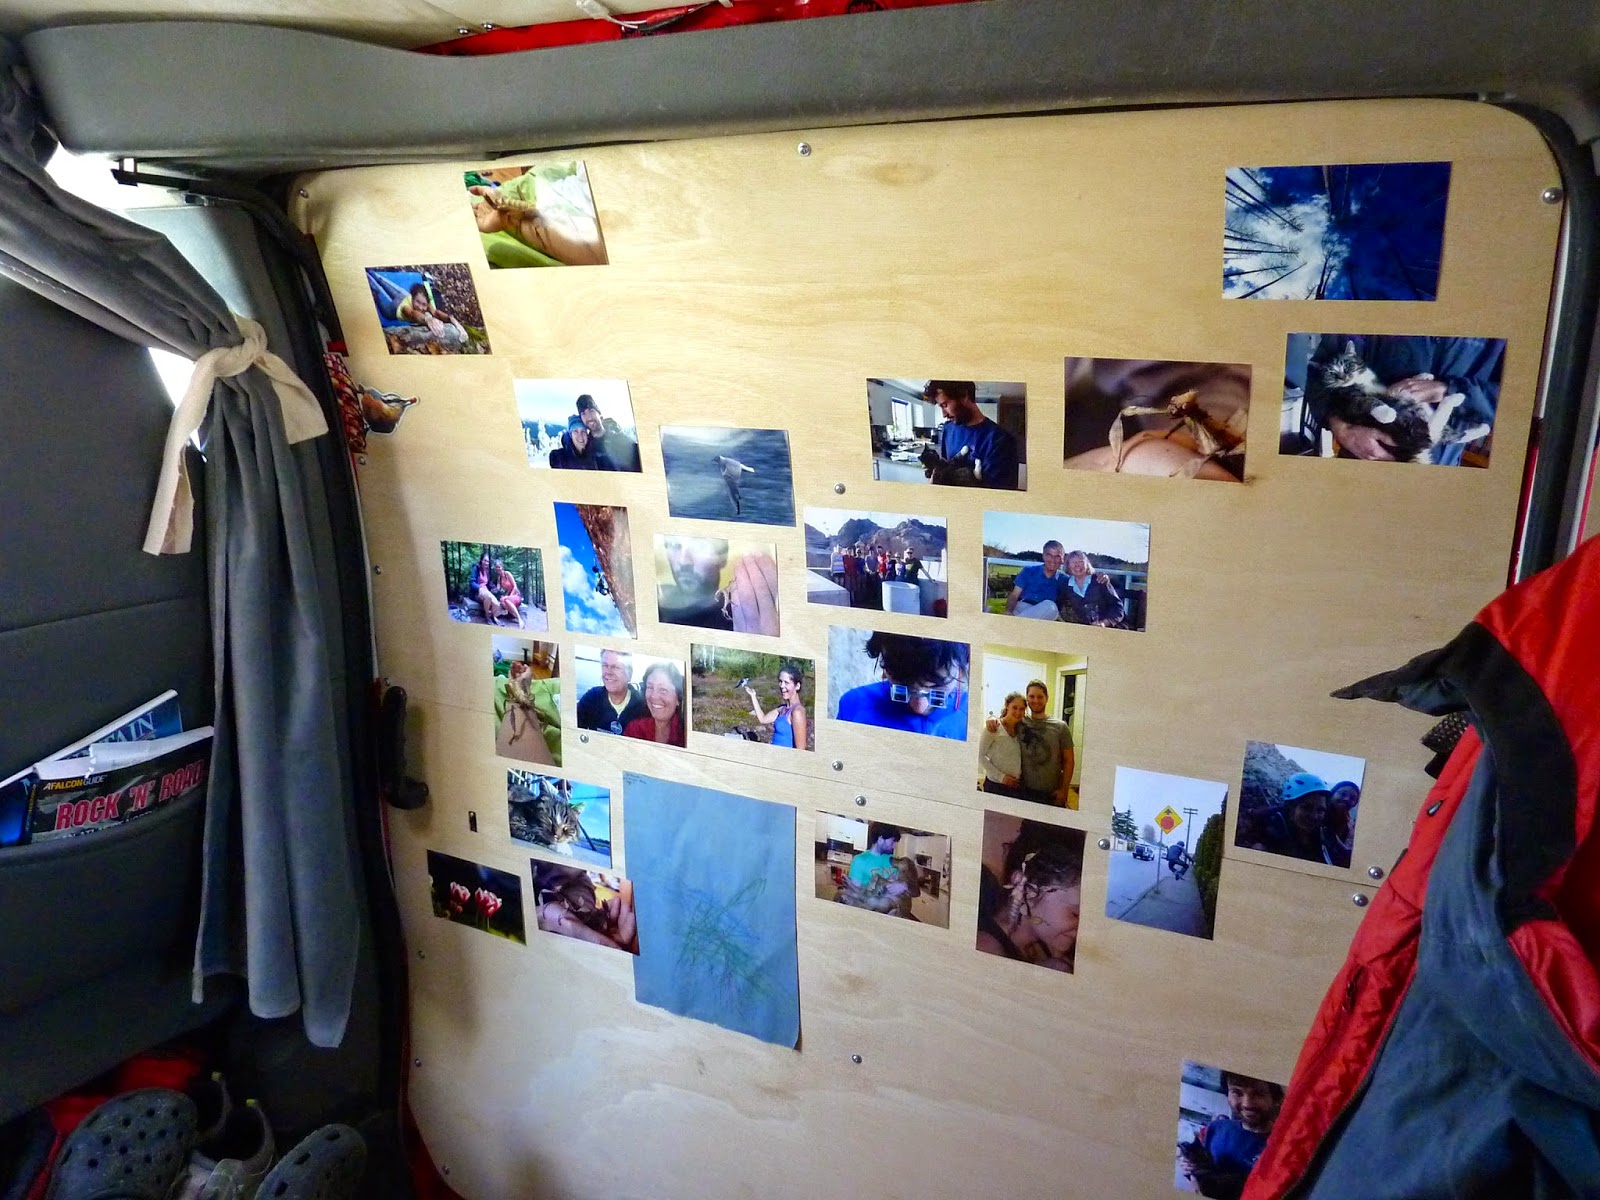
Finally, we have started a memory wall on our sliding door. So far we have put up some photos from home, but we're planning to keep adding as the trip goes on.


There are several areas to boulder in Bishop, and we focused most of our attention on three of them: The Happy Boulders, the Sad Boulders, and the Buttermilks. The Happies and the Sads are small canyons packed to the brim with volcanic tuff boulders. Pockets, crimps, jugs - steep overhangs and technical slabs - basically lots of fun movement and sequencing potential. The Milks are well spaced, impressively huge monzonite boulders. Skin robbers, but lots of fun.
Graham and I tried to climb as much as we could in these three areas. We wrapped up with G topping 190 problems (VB to V11), and me finishing 88 (VB to V5). Our time in Bishop is the longest period completely dedicated to bouldering that Graham and I have now experienced....and our bodies are feeling it. As much as we didn't anticipate saying this, we are looking forward to the few days of rest before we make it to our next destination. Raw and bleeding tips, aching wrists/tendons/joints, sore muscles to the point of feeling bruised all over, and plenty of surface scrapes and bruises to top it all off. Yet - this is all part of the game, part of the joy of working projects and making progress and experiencing new lines. This is what we love.

A few of the problems we climbed were memorable enough to occupy our day dreams and night dreams, and keep us focused and ambitious. These were projects that shut us down, kept us trying, kept us fighting. Heartbreaks (some of them which are STILL heartbreaks), and those that ended in celebration. Here were some of our favourites:
Acid Wash (V10).
First V10 of the trip. This was one of two problems Graham had his sights set on before heading out to Bishop. Over the course of two days he worked out the moves, with the last move giving him the most trouble. After countless attempts going to the last hold, Julie suggested, "why don't you grab the good part?" So smart... following her great advice, Graham sent first go next day!

Sucker Punch (V5).
I spent four days over the course of nearly three weeks working this climb. The line is beautiful, powerful, short, crimpy, and fun. Each day ended with a little bit of progress, hence the desire to continue. Unfortunately it is also a climb that demands a lot of skin, and with a tough right-hand full crimp at the crux, it is rough on the tendons as well. After a session on the fourth day of working it, I left it for another day. A few hours later though, we walked past and I decided to have one. more. go. A send!


Morning Dove White (V7).
A beautiful problem on the rim, visible from much of the canyon. The problem moves from pockets to crimps with core intensive changes in body position along the way, and a spookily high top out that keeps the heart going at the finish. This problem frustrated Graham beyond belief. He made it to the hold just before the horizontal break on his first go, but despite days of trying, was unable to latch the good holds that lead to the top. Eventually, Graham switched the beta for the last move and topped out second go with the new beta! Hurrah!


Beefcake (V10) / Beefy Gecko (V11).
Beefcake was the other climb (along with Acid Wash) that Graham had his sights set on in Bishop. This was until he went and actually tried it one afternoon following a long day of climbing.... moves that felt way too hard for him to do. After those few tries he had essentially given up on the problem, but the niggling ambition eventually encouraged him to return to try again. We went one afternoon (where we met Sam and Josh!) and he was able to figure out the crux moves in isolation. We went back the next day and after a few attempts Graham topped the problem out! On Dan's recommendation, he decided to try Beefy Gecko, a problem that does the crux moves of Beefcake then proceeds right to do one more hard move before a jug finish. A send next day marked his first V11!! Wooooo!


Fly Boy Arete (V5).

 |
| Our route to Bishop, California |
***
First, a quick update on our van home. The Millenium FalcVan has been great for us, and we have all the room we need. It's a wee bit cluttered at the moment, but here are its primary features....The shelf that holds many of our random bits. Books on hand, first aid kits, muscle/tip/dry skin equipments, etc etc. Yoga mats for essential stretching times.
Our kitchen area! Many more essential things (food!) are stored in these cupboards. The counter is just the right size for prepping cold meals late at night, or storing delicious 35 cent loaves of bread from Erick Schat's bakery...
The front area, behind the curtains. This tends to be the hardest to keep organized, mostly because of the constant turnover of hiking shoes/flip flops/climbing shoes/camp slippers, and the (many) very inexpensive cases of beer... Our plug-in cooler, which has been working GREAT as powered off our solar panel, fits perfectly between the seats.
The bed has turned out to be plenty big enough and nice and cozy. We have a thermometer in the van, and so far mornings have been between about 3 and 6 degrees when we wake up - so the hardest part about the bed seems to be getting out of it!
Finally, we have started a memory wall on our sliding door. So far we have put up some photos from home, but we're planning to keep adding as the trip goes on.
***
The bouldering in Bishop has been outstanding, but one of the coolest things has been the chance to climb with so many great friends. In a culmination of vans and climbing psych, we spent nearly three wonderful weeks with Julie, Dan, Mika and Tristan, and also had the pleasure of connecting with the lovely Aussie's, Ali and Jordan.
We had the joy and pleasure of meeting Sam
and Steph (check out their roadtrip and blog here), Josh, and Matt as well many
other lovely human beings. Great bouldering, great Shanghai Rummy, great Sleepytime tea. I don't think I managed any true group shots, but a number of moments do capture some of the good times...
There are several areas to boulder in Bishop, and we focused most of our attention on three of them: The Happy Boulders, the Sad Boulders, and the Buttermilks. The Happies and the Sads are small canyons packed to the brim with volcanic tuff boulders. Pockets, crimps, jugs - steep overhangs and technical slabs - basically lots of fun movement and sequencing potential. The Milks are well spaced, impressively huge monzonite boulders. Skin robbers, but lots of fun.
Graham and I tried to climb as much as we could in these three areas. We wrapped up with G topping 190 problems (VB to V11), and me finishing 88 (VB to V5). Our time in Bishop is the longest period completely dedicated to bouldering that Graham and I have now experienced....and our bodies are feeling it. As much as we didn't anticipate saying this, we are looking forward to the few days of rest before we make it to our next destination. Raw and bleeding tips, aching wrists/tendons/joints, sore muscles to the point of feeling bruised all over, and plenty of surface scrapes and bruises to top it all off. Yet - this is all part of the game, part of the joy of working projects and making progress and experiencing new lines. This is what we love.
A few of the problems we climbed were memorable enough to occupy our day dreams and night dreams, and keep us focused and ambitious. These were projects that shut us down, kept us trying, kept us fighting. Heartbreaks (some of them which are STILL heartbreaks), and those that ended in celebration. Here were some of our favourites:
Acid Wash (V10).
First V10 of the trip. This was one of two problems Graham had his sights set on before heading out to Bishop. Over the course of two days he worked out the moves, with the last move giving him the most trouble. After countless attempts going to the last hold, Julie suggested, "why don't you grab the good part?" So smart... following her great advice, Graham sent first go next day!
Sucker Punch (V5).
I spent four days over the course of nearly three weeks working this climb. The line is beautiful, powerful, short, crimpy, and fun. Each day ended with a little bit of progress, hence the desire to continue. Unfortunately it is also a climb that demands a lot of skin, and with a tough right-hand full crimp at the crux, it is rough on the tendons as well. After a session on the fourth day of working it, I left it for another day. A few hours later though, we walked past and I decided to have one. more. go. A send!
Morning Dove White (V7).
A beautiful problem on the rim, visible from much of the canyon. The problem moves from pockets to crimps with core intensive changes in body position along the way, and a spookily high top out that keeps the heart going at the finish. This problem frustrated Graham beyond belief. He made it to the hold just before the horizontal break on his first go, but despite days of trying, was unable to latch the good holds that lead to the top. Eventually, Graham switched the beta for the last move and topped out second go with the new beta! Hurrah!
Molly (V5).
Definitely
my favourite problem so far in Bishop. A hard, beautiful line that climbs with
big yet technical moves on small holds, up a tall and slightly overhanging face
– with the business up high. Super proud of this climb, it was super fun every
time I was on it, and one that I felt provided measurable success each day.
Beefcake (V10) / Beefy Gecko (V11).
Beefcake was the other climb (along with Acid Wash) that Graham had his sights set on in Bishop. This was until he went and actually tried it one afternoon following a long day of climbing.... moves that felt way too hard for him to do. After those few tries he had essentially given up on the problem, but the niggling ambition eventually encouraged him to return to try again. We went one afternoon (where we met Sam and Josh!) and he was able to figure out the crux moves in isolation. We went back the next day and after a few attempts Graham topped the problem out! On Dan's recommendation, he decided to try Beefy Gecko, a problem that does the crux moves of Beefcake then proceeds right to do one more hard move before a jug finish. A send next day marked his first V11!! Wooooo!
Fly Boy Arete (V5).
The
problem that did my finger in... So pleased to have walked away with a send on
this one, even though I would trade no send for no injury in a heartbeat. I had
a great time working this problem with friends
- it was hard for me the whole way through, a climb that demanded almost
more than I thought I had to give out. To top it all off, the top out felt like
the most desperate struggle of any of my projects so far. Fun, powerful, and thrutchy - I'd recommend it!
 |
| Photo by Tristan Ploughman |
We are off to Joshua Tree now for
Christmas, but much of Bishop remains on our radar… we’ll be back.
Thursday, November 20, 2014
Hitting the road
We are on our way. Conversion = finished.
Our conversion project certainly demanded more than we expected, and of course took an unexpected amount of time to complete. We arrived in Victoria to work on the van on September 20, with grand ambitions of being on the road quickly. We were proven wrong...
Departure Goal #1: October 7, about 3 weeks after arrival. Quick rush for dentist appointments, insurance changes, etc before leaving.
Departure Goal #2: October 13, Thanksgiving
Departure Goal #3: October 18, leave on or around Mom's birthday
Departure Goal #4: October 25, the last weekend of October
Departure Goal #5: October 31, make it back to through Vancouver before November
Departure Goal #6: November 5, we can do it!
Departure Goal #7: November 9, by the end of the weekend
Departure Goal #8: November 13, seems reasonable...and on our way before the weekend
Departure Goal #9: November 16, out by the end of the weekend
Departure Goal #10: November 18, before the rains come
Actual Departure: November 20, two months after arrival
AND we're on our way now! Three and a half years in the making, we find it hard to believe that this road trip is really real. Over the next couple days we're taking the Millenium FalcVan through Vancouver and Seattle to see friends, then will be off to Bishop, California for the first month or so of climbing. Our goal is to post at least once for each location we visit throughout our adventure. We will also post more photos of the finished conversion in the near future. Friends and family - we're cancelling our phones tomorrow, so may the internet keep us connected.

For every great adventure,
Graham and Kim
Our conversion project certainly demanded more than we expected, and of course took an unexpected amount of time to complete. We arrived in Victoria to work on the van on September 20, with grand ambitions of being on the road quickly. We were proven wrong...
Departure Goal #1: October 7, about 3 weeks after arrival. Quick rush for dentist appointments, insurance changes, etc before leaving.
Departure Goal #2: October 13, Thanksgiving
Departure Goal #3: October 18, leave on or around Mom's birthday
Departure Goal #4: October 25, the last weekend of October
Departure Goal #5: October 31, make it back to through Vancouver before November
Departure Goal #6: November 5, we can do it!
Departure Goal #7: November 9, by the end of the weekend
Departure Goal #8: November 13, seems reasonable...and on our way before the weekend
Departure Goal #9: November 16, out by the end of the weekend
Departure Goal #10: November 18, before the rains come
Actual Departure: November 20, two months after arrival
***
For every great adventure,
Graham and Kim
***
Tuesday, November 4, 2014
DIY VanLife: GMC Savana Camperization – Bed, Storage, Kitchen
Ha. It turns out the finickiness was very high and compounded by the fact that this part of the construction timeline overlapped with Thanksgiving weekend and my mother's "Birthday Week" - both of which were essentially no-gos for getting anything done.
Graham and I have decided that the hardest part about doing a conversion is the decision making. We spent most of our time thinking and mapping and rethinking... each decision was critical and changed many times, particularly with the bed plan as this is the most important storage area in our van house. The "underbed" will eventually store:
- ALL climbing gear
- Clothing
- Propane
- Stove
- Kitchen + Kitchenware
- Deep Cycle Battery
- Cables, diode, breaker, controller, etc...
- other stuff
We knew we wanted a stationary bed, so we figured out the width that would work for Graham to sleep sideways across the vehicle. He is 5'11" and after the walls and insulation went in, the van spanned 5'9" inside. We started our planning by mapping everything out with painter's tape on my parents' living room floor. Note: while these photos are similar to our final layout, it did change a fair bit.


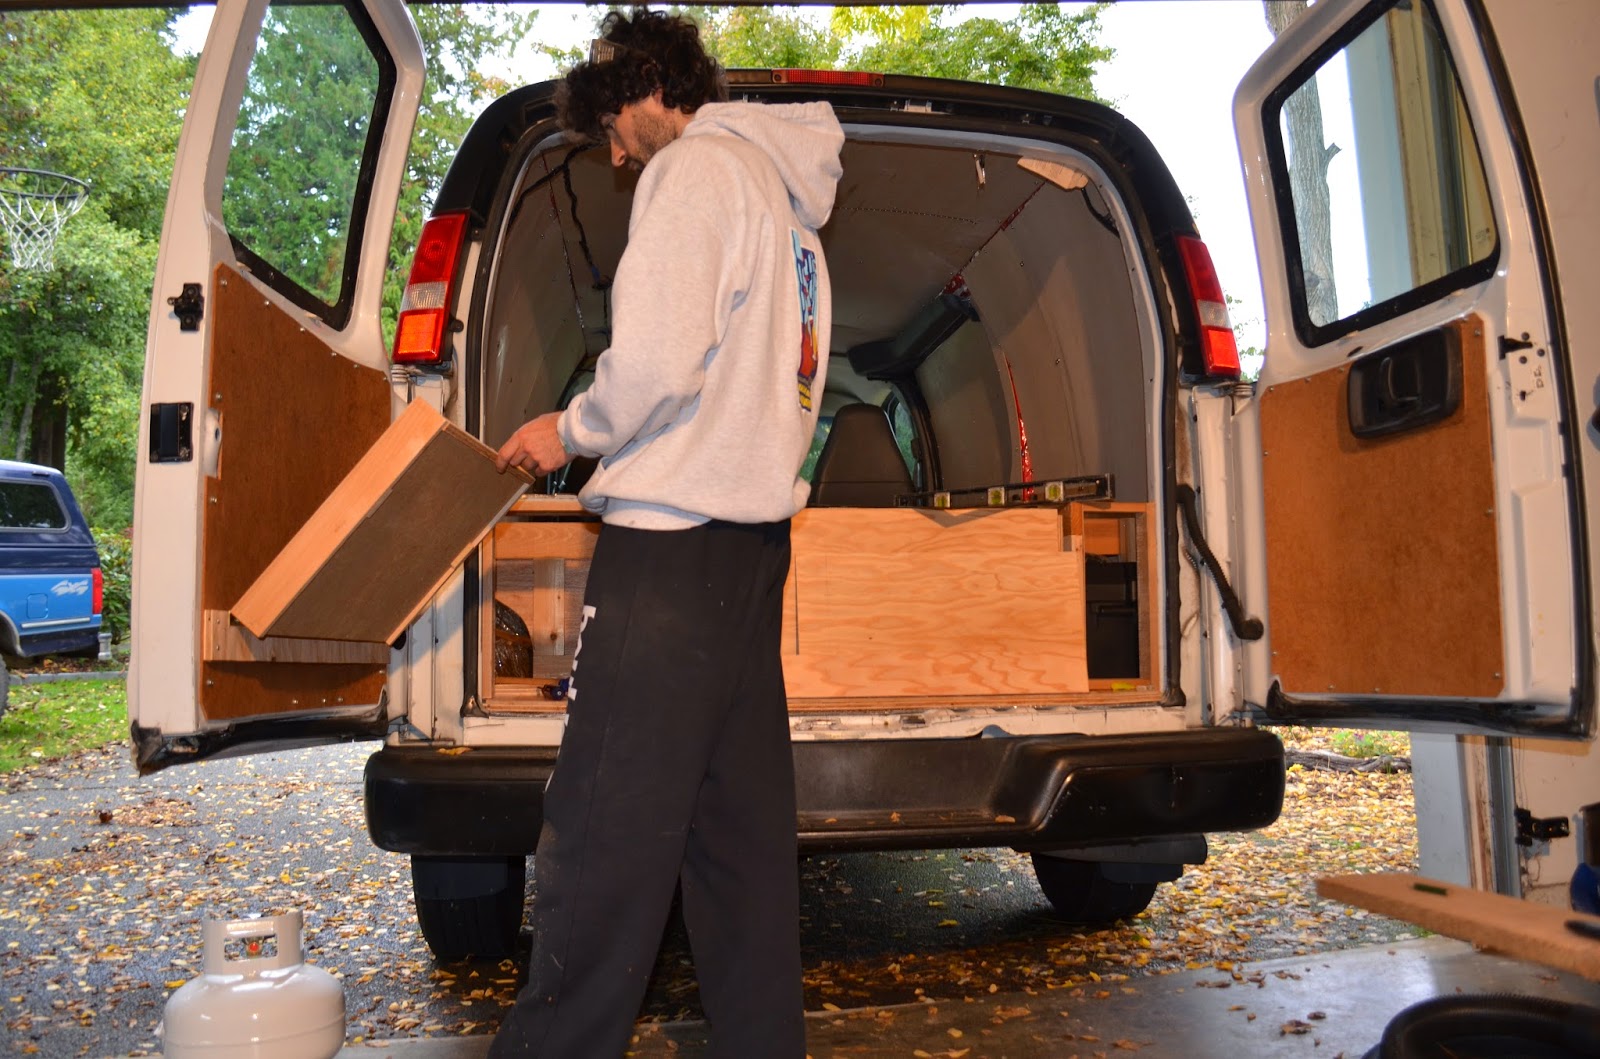
Next, we built structural supports to go against the two walls and added horizontal beams throughout the structure to help us further compartmentalize around the wheel wells and add support for the bed top.


The next big mission was building the drawers. We bought 28" 200lb full extension drawer slides for the back drawer - this will be where we store our gear. For the interior clothing (etc) drawer we picked up 26" 100lb full extension slides. The drawers themselves actually took quite a while to build, in part due to their large size, and in part due to the fact that there is only 1/32" wiggle room to play with for the drawer slides. We used 5/8" plywood for the drawer bases and 1/2" plywood for the sides. 96 screws and a lot of wood glue later...


After accounting for spacing around the drawers, both ended up being 14 1/4" deep. The gear drawer is 28 1/2" long and just over 29" wide, and the clothing drawer is 27" long and slightly wider (due to the smaller slides). These are very big drawers! We added a snazzy divider to the clothing drawer so our panties don't touch ;)


We mounted the drawers and learned some very useful tips from this handy YouTube video (Thanks for sharing Dan!). Once the drawers were in, we screwed the entire bed base down into the floor, via structural beams and corner brackets. As vans shift while driving, we wanted to screw the bed to EITHER the floor or the walls. We opted for the floor as it had a lot more options and seemed like a safer bet.


Two sheets of 5/8" plywood provided more than enough wood to build our bed top, which we did in three pieces. We measured the width every 4" to make sure that the wood would curve with the shape of the vehicle. At its largest, the bed is 57 1/2" long and 70" wide. Graham will sleep on a bit of an angle, but it's a very reasonable size for two.

Aside from our kitchen (coming up!) most of the access into the under-bed-storage will be through top down doors. Our battery and wiring will all be in the compartment to the right of the drawers... here is our entry hole!

The other exciting thing that we have built at the back of the van is our kitchen. We have a two-burner propane stove which we really wanted to use, but we weren't interested in the hassle of doing a proper propane installation in the van. Luckily, opening the back doors creates a nice little kitchen work area, allowing us to cook outside while still being close to home! We designed the left-side underbed compartment as our kitchen storage. As the space is 16" high, we purchased a stout 11lb propane tank to fit. Graham built a plywood holder for the tank to fit in against the wall, and we added a small strip on the floor to hold the stove up on its side (extra straps for both these items are to come).


On the left back door we cut down a drawer from an old cabinet to become an edged platform for our stove to sit on when cooking. We used a leftover strip of 1/2" plywood as a support base, and bought and cut piano hinges to connect the platform. We cut webbing out of old backpacks and screwed it to the platform and the metal door so that the platform would sit flat when open. Turns out this was very very tricky... my parents' driveway slopes in two directions, so figuring out what was level was almost impossible. It took several retries and driving down the street to a flat section equipped with a cordless drill to get it right.


On the right side door we used the same method to create a counter prep space. I used some leftover arborite counter top from one of my parents' reno-projects and contact-cemented it to a piece of 1/2" plywood. This worked great, and now we have a smooth waterproof finish! The only change we're thinking of making to these two drop-down tables is adding adjustable straps.


We've got a few more access holes, doors, fences, and straps to add to this part of the van, but otherwise the bed and storage area is done! Meanwhile, we've been working hard on other cabinets, and collecting items for our solar set-up. Stay tuned for pictures :)
Kim and Graham
Subscribe to:
Posts (Atom)